Main Phases and High-Level Steps of Creating a Product Roadmap
All teams should create a product roadmap by following the same high-level phases: defining the strategy, audience, and goals; creating a general product timeline; prioritizing the specific features to create; and sharing and updating the roadmap.

Kris Drey has worked as a digital and physical product management executive for more than 20 years and is the Founder and CEO of The Byrd. He relays the importance of understanding your audience before you start creating the roadmap itself.
“When it comes to communicating your roadmap publicly, the nature of your audience determines what document you should use to convey, present, or deliver the information in the roadmap. Executives like short, concise, broad strokes; slides are ideal for communicating with that particular audience. Sales teams focus primarily on revenue, making spreadsheets more applicable to that group. The best way to address the public is in a document,” he says. “It’s important to know your audience and to speak to them in a way that they are comfortable and familiar with. Otherwise, you run the risk of losing them,” adds Drey.
Product managers are typically the folks creating the product roadmap. Because, as Drey says, “product managers are liaisons and are required to speak many ‘languages,’” they should be able to tailor the roadmap to the intended audience. For example, Drey continues, “you would not want to present a slide deck to engineers who are looking for details on how to build a feature.”
See our step-by-step guide to creating a product roadmap below.
Types of Product Roadmaps
Common types of product roadmaps include a classic product roadmap, features roadmap, release roadmap, epics roadmap, portfolio roadmap, and strategy roadmap. Each type displays a unique perspective on the course of product development. Roadmaps are tailored to a specific audience.
Learn a bit more about each type of roadmap below:
- Product Roadmap: This is your standard product roadmap, which details the overall product vision.
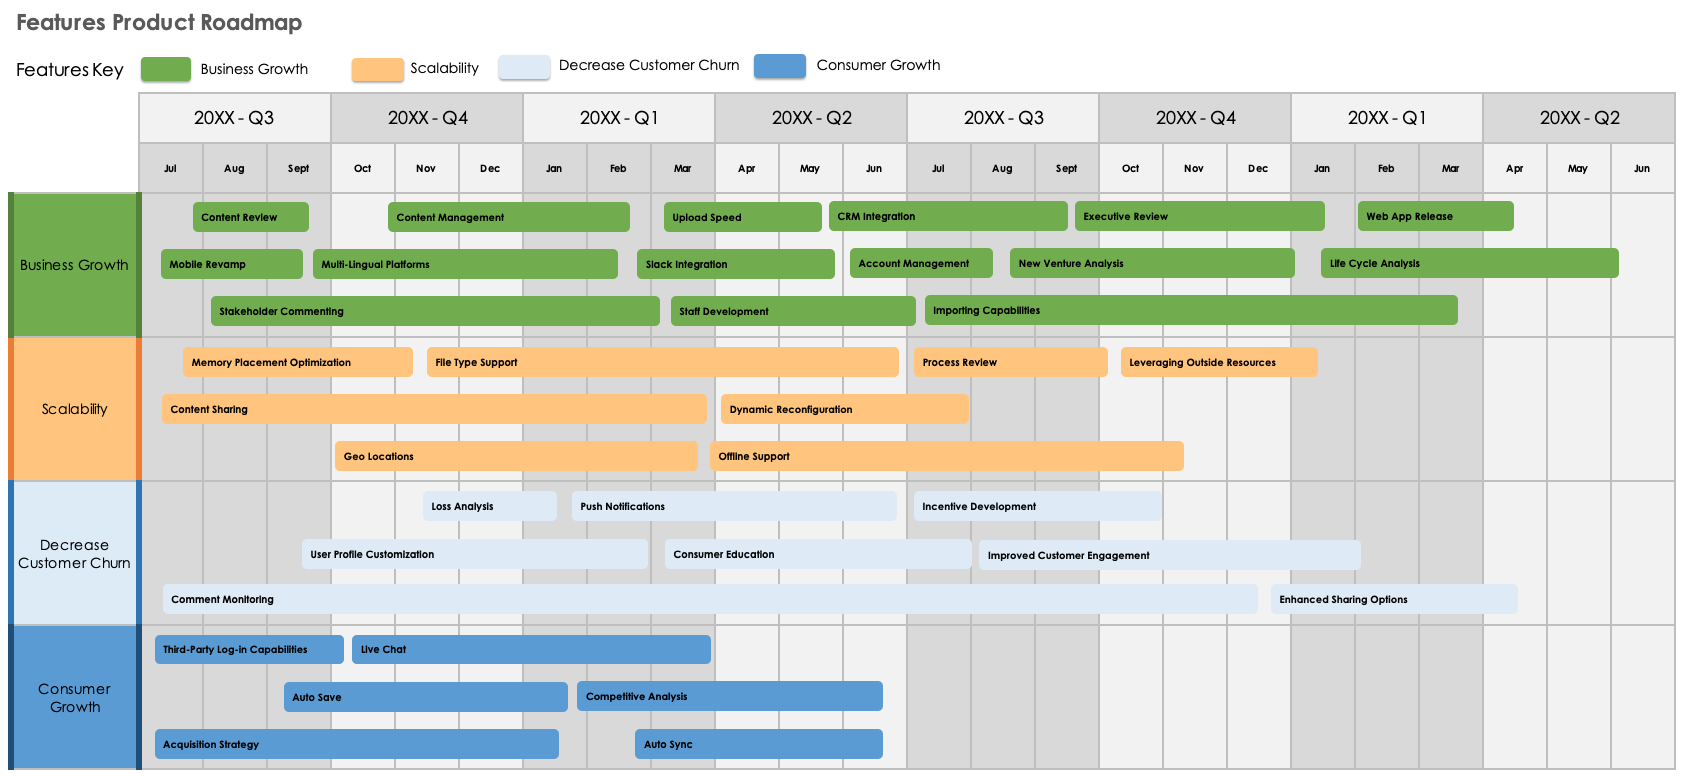
- Features Roadmap: This type showcases the general timeline and sequence for the delivery of new features. It is intended for the development team.
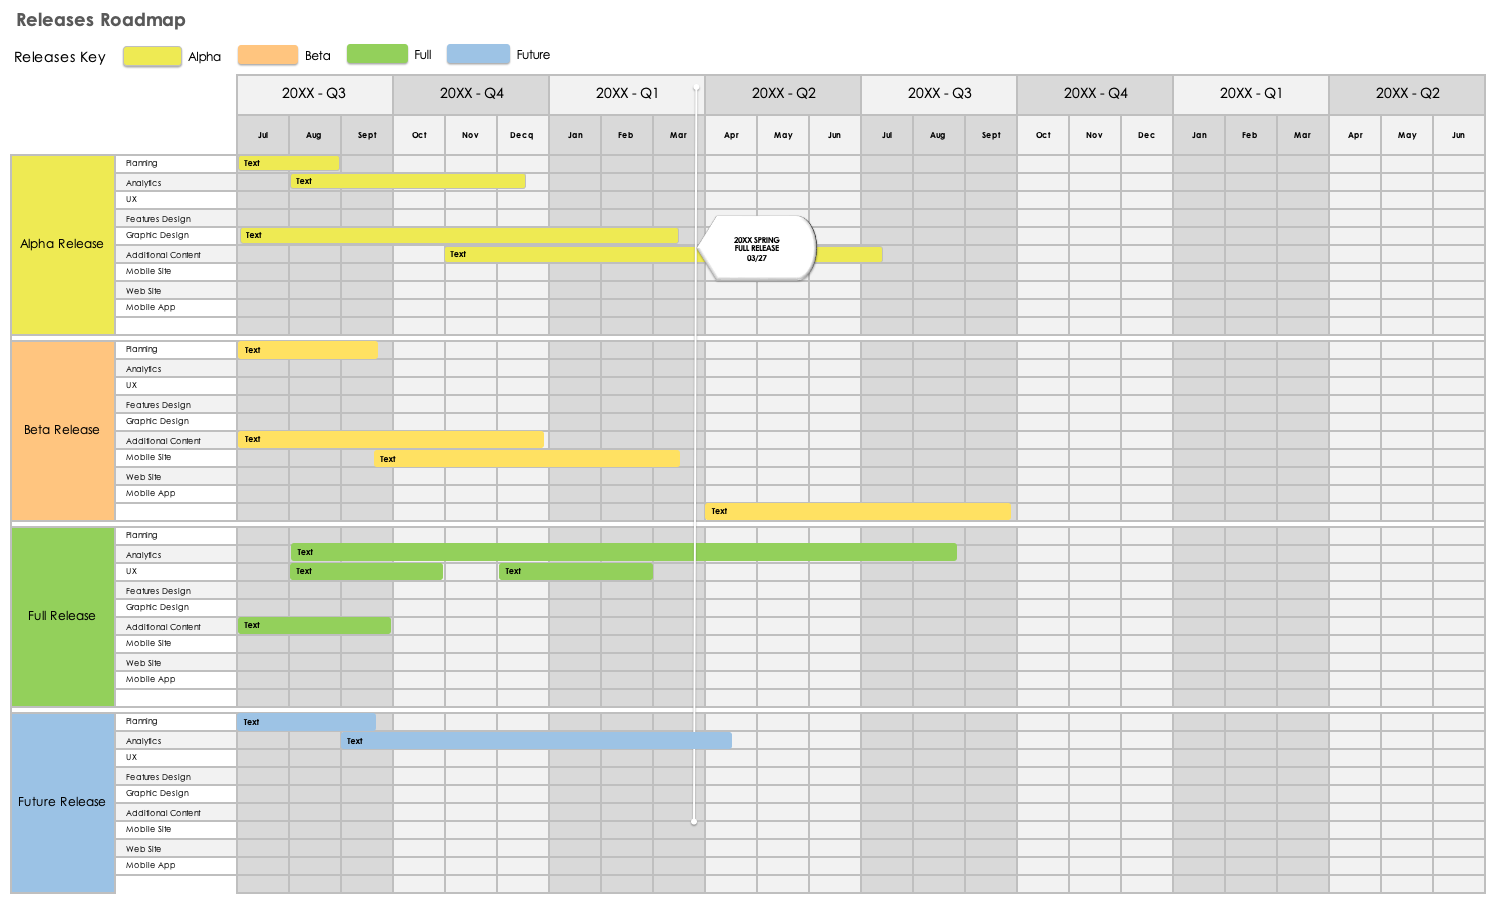
- Release Roadmap: This is a granular view of all the activities, roles, and responsibilities for each individual feature release.
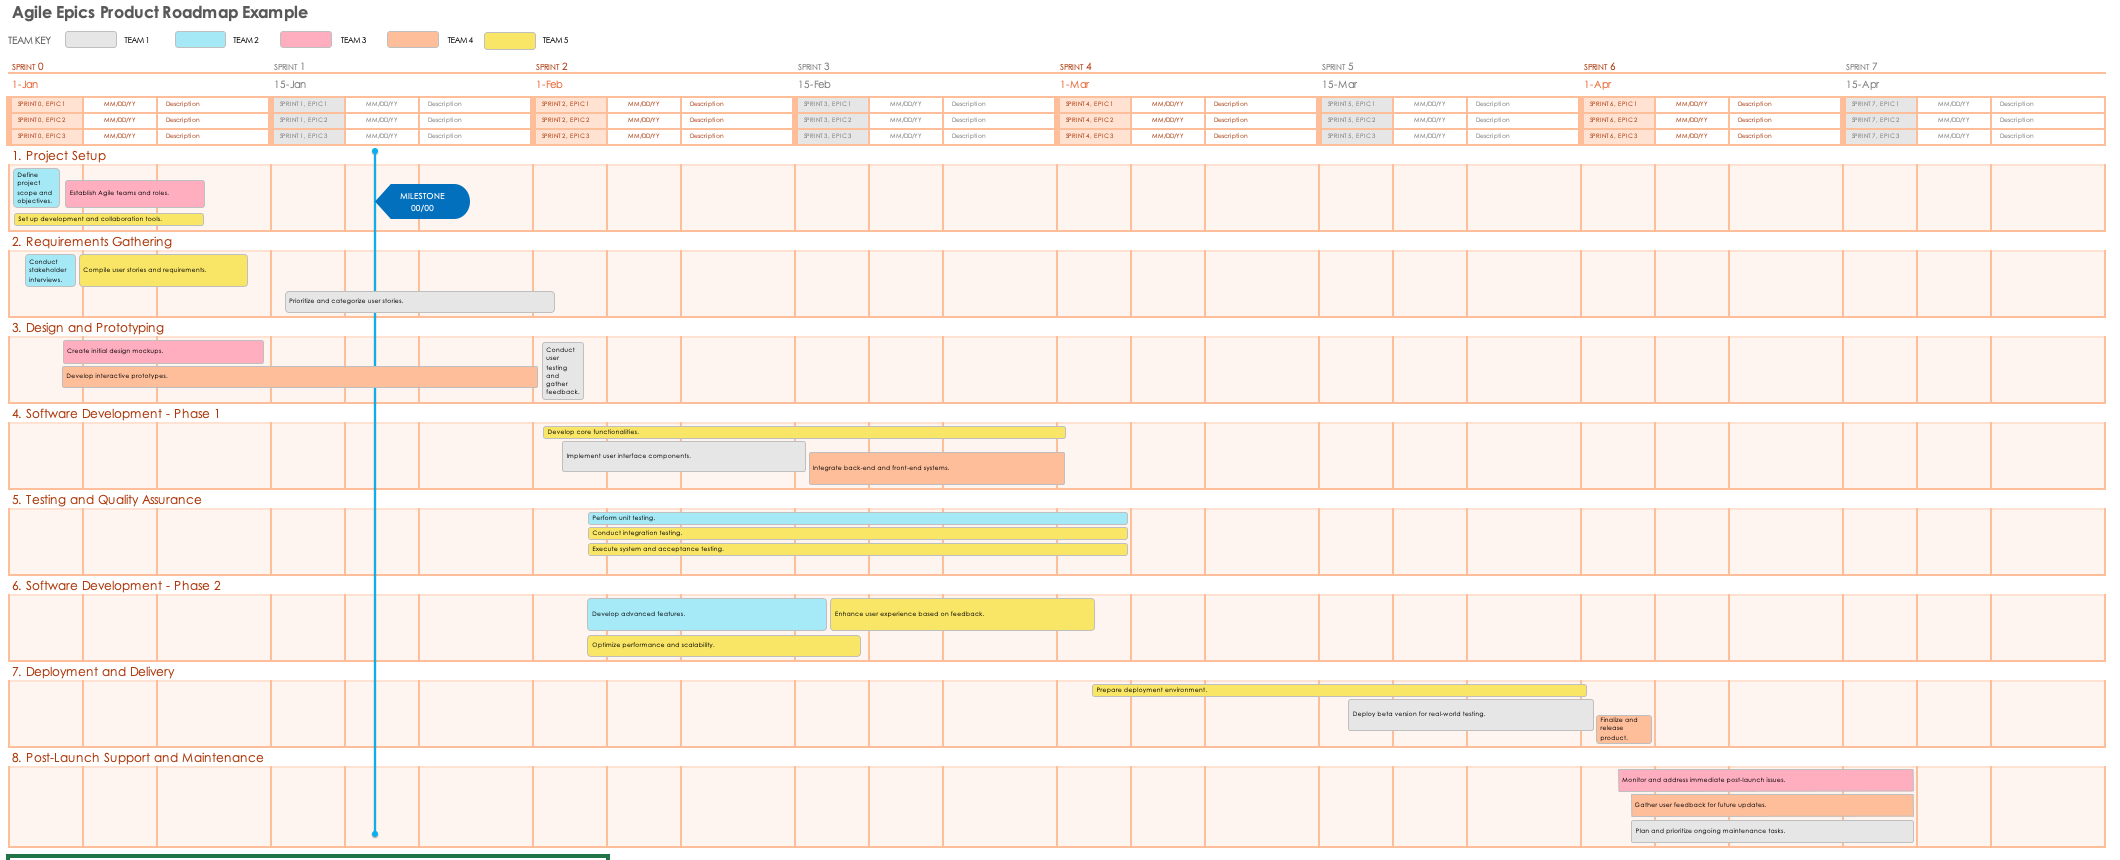
- Epics Roadmap: Also called an Agile epics roadmap, this type groups related features into epics. Development teams can use this type of roadmap as a prioritization tool. Learn more about the different types of Agile product roadmaps with this guide, and find free Agile product roadmap templates.
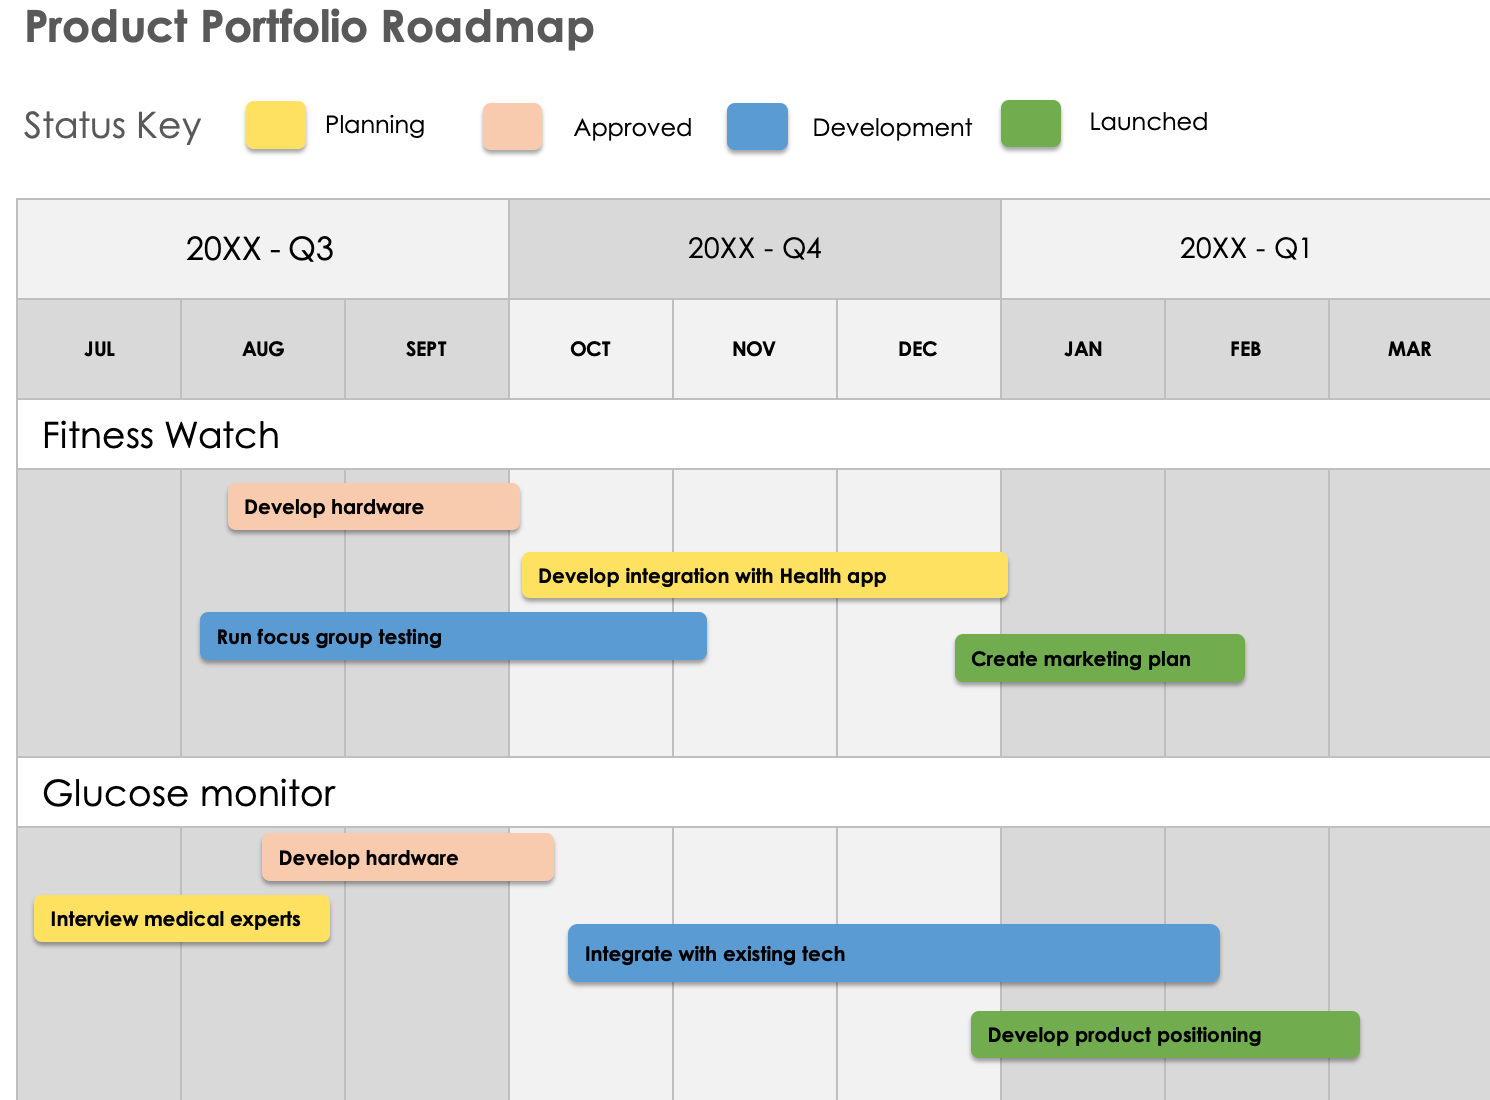
- Portfolio Roadmap: This is a visual tool for understanding the relationship between and prioritization of multiple projects within a single initiative, all in one view.
- Strategy Roadmap: This roadmap outlines the overall strategy and tactics you will implement to achieve your goals. It is a high-level view that is best for executives or management.
All of these types of roadmaps fall into one of the three main categories of product roadmaps: goals, timeline, and features-oriented. Learn more about all three categories with this roundup of real-world product roadmap examples.
Use the chart below to decide which type of roadmap is best for your specific circumstances.
| Intended Audience | Key Information to Communicate to This Audience | Type of Roadmap You Should Create |
|---|---|---|
| Development Team | Detailed breakdown of upcoming work | Epics roadmap |
| Development Team | Upcoming features they will be working on | Features roadmap (internal) |
| Development Team | Prioritization and rough schedule of each feature release they will be working on | Release roadmap |
| Executives/Management | Overall strategy behind product | Strategy roadmap |
| Executives/Management | Relationship between and prioritization of upcoming features or products within larger product suite | Portfolio roadmap |
| Sales Team | Goal and positioning of upcoming products or feature releases | Strategy roadmap |
| Customers / The Public | Upcoming feature releases | Features roadmap (higher level, intended for external use) |
Steps to Create a Product Roadmap
To create a product roadmap, follow these steps: create a product strategy, define your audience, define your product’s themes, establish goals, create a timeline, present your roadmap, and update your roadmap. It’s critical that you carefully plan your roadmap before diving in.
Below, learn about each step in more detail:
1. Create a High-Level Product Vision and Strategy
Before jumping in to create your product roadmap, clarify your strategic vision for the product itself. Answer the following questions with your team:
- Why are we developing this product?
- What value will this product deliver to our customers? Take into account how your competitors stack up and what unique value your product will offer.
- Which specific features or attributes will we prioritize?
Once you’re aligned on this information, define the high-level strategy for your product. Create a rough business model that defines how the product will generate revenue, the essential features, and any successive updates. Even if you aren’t creating a strategy or goals-oriented product roadmap, it’s important to define this information at the beginning.
2. Determine Your Audience
Who is your roadmap for, and what do you need to communicate to them? Knowing the answers to these questions is essential because you will construct your roadmap to fit your audience’s specific needs. For example, the C-suite may need to know your strategic plan, while the development team needs to know the upcoming list and prioritization of features they will be working on.
Once you’re clear on your audience, you’ll know if you need to create a goals, features, or timeline-oriented roadmap.
3. Create Strategic Product Themes
Next, determine the product’s main themes. These include the broad, overarching intentions regarding the product development or improvement work you plan to do, such as “improve user experience” or “generate more customers.” These core themes will help you identify your central strategic goal later on.
Once you have a clear idea of the major themes, assess which themes are most vital to the success of the product. Doing so will help you assign weight to each theme — to take the above example, it might be more important to improve the user experience than to generate new customers.
Now, create swimlanes for each theme. These swimlanes help you stay organized as you build the actual roadmap because they allow you to layer in epics, or large chunks of work that you can further break down into individual tasks.
4. Set the Product Scope and Goals
Now that you have product themes, develop the product scope and identify strategic goals. Approach this process as a collaboration among cross-functional teams, so you can create goals that are realistic and meet the needs of everyone working on the product.
It is rare for everyone to agree on the specific scope and goals from the outset. Instead, this step will likely be an ongoing collaborative effort to determine what’s most integral to the strategic objectives of the business.
During these conversations, back up every idea with a hypothesis that you need to validate. Validate each hypothesis before adding it to the official list of goals and scope.
5. Create a Timeline
Define a general timeline for the product based on your goals and scope. This should not be a detailed, rigid schedule; it should be a general outline of how long you expect the work to take (a year, quarter, month, single sprint, etc.). Include significant milestones and product developments.
The level of detail you include here will vary by product and the type of product roadmap you choose to create. For example, goals-oriented product roadmaps take a higher-level view (e.g., what you hope to accomplish in the next quarter), while features-oriented timelines sketch out the basic sequence of epics. Timeline-oriented product roadmaps are the most granular, as they are intended to communicate scheduling information. Still, you should avoid committing to hard dates.
6. Present the Product Roadmap to the Appropriate Audience
Present your roadmap to your audience, whether that includes management, the development team, other internal teams, or the public. As you prepare for the presentation, ensure that your roadmap includes only information that is appropriate to share with this audience and that it adequately answers their common questions.
Welcome feedback on the roadmap and know that you may have to pivot based on your audience’s reactions.
7. Update the Roadmap as Necessary
Remember that the roadmap is likely to change throughout a product lifecycle. Leave time and space for these updates and don’t let tweaks to the original plan throw you off course. You need to remain flexible and collaborative, particularly in Agile environments.
To learn more, check out this guide to best practices for visual product roadmaps.
Common Elements of Product Roadmaps
When creating a product roadmap, your goal is to translate the overall goals and strategy into a clear, prioritized plan of tasks. A strong product roadmap should include the following:
- Goals: What are the main goals of the product?
- Product Vision: What is the vision or the why of the product?
- Strategy: How will you accomplish these goals and realize the product vision?
- Tasks: What are the main tasks that you need to accomplish? Note dependencies and provide an outline of the prioritization and progression of tasks.
- Epics: If you’re working in an Agile methodology, you might use your roadmap to group tasks in larger epics, or batches of work units. Doing this can help you with sprint planning and resource allocation.
- Features: What are the main features you plan to create or improve upon?
- Releases: When and in what order do you plan to release each feature listed above?
- Timeline: How long do you expect this work to take? As mentioned, a product roadmap should not be a detailed, rigid schedule of tasks. Instead, provide an estimate of how much time it will take to complete the work.
Note that not all categories of product roadmaps require all of the elements above. In a goals-oriented product roadmap, for example, you don’t need to include a release schedule; in a public-facing timeline-oriented roadmap, you don’t need to include a behind-the-scenes explanation of your product strategy.
Some product roadmaps also include the following elements, though they are not required:
- Critical Path: The critical path shows the minimum time necessary to complete the product. You may choose to highlight this chain of tasks (including approximate timing) for management.
- Dependencies: You may choose to show the relationship between critical tasks, such as which items you must complete first in order to start on others.
- Legend/Key: Consider adding a legend or key to your roadmap, so viewers can make sense of any symbols, color-coding, or other visual cues.
- Metrics: You can also use the product roadmap to highlight key metrics or key performance indicators (KPIs) that you plan to track in order to measure the success of your product.
- Milestones: You may choose to note any critical milestones or markers that your team must hit by a certain date, or that predict the health of the product down the line.
- Percent Complete: If any of the actions on your roadmap are already in progress, consider adding a label that shows progress, i.e., percent complete.
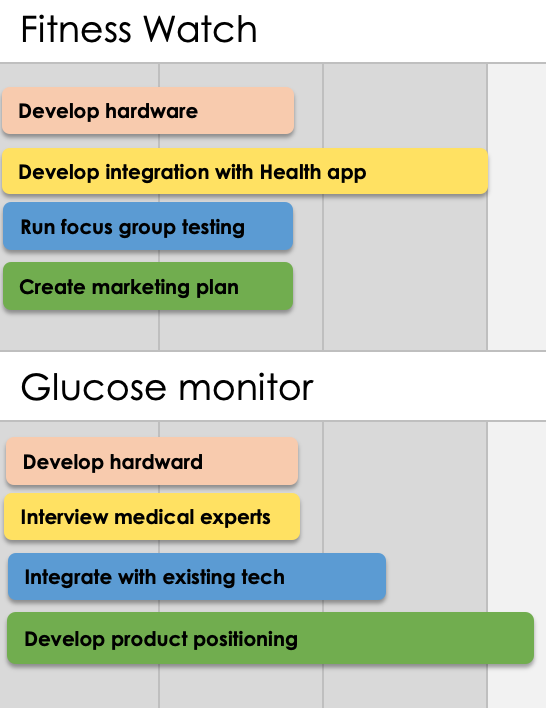
- Swimlanes: In feature-oriented product roadmaps, teams often include swimlanes to categorize work items in a clear, easy-to-visualize way.
- Task Status: Similarly, you might also include a field for each task that clearly displays its status, i.e., whether it’s not started, in progress, or completed.
- Themes: Larger scope product roadmaps often include themes, also called containers. This step allows you to group features and releases thematically.
On the flipside, you should not include the following:
- Hard Dates: Unless specifically requested by your audience, strict dates have no place in the product roadmap. Use the roadmap to frame the estimated schedule of events, not to lock your team into a hard schedule.
- Non-Value Items: There is no need to include additional potential elements or out-of-scope tasks. The roadmap should be clear, direct, and concise and should only relay the most important aspects of upcoming product-related work. For example, do not include potential responsive actions, such as a bug fix or failed test. That said, you should assume a certain amount of flexibility in order to accommodate unexpected events — those unforeseen circumstances being a key reason for not including fixed dates.
Product Manager Roadmap Starter Kit
Download the Product Manager Roadmap Starter Kit
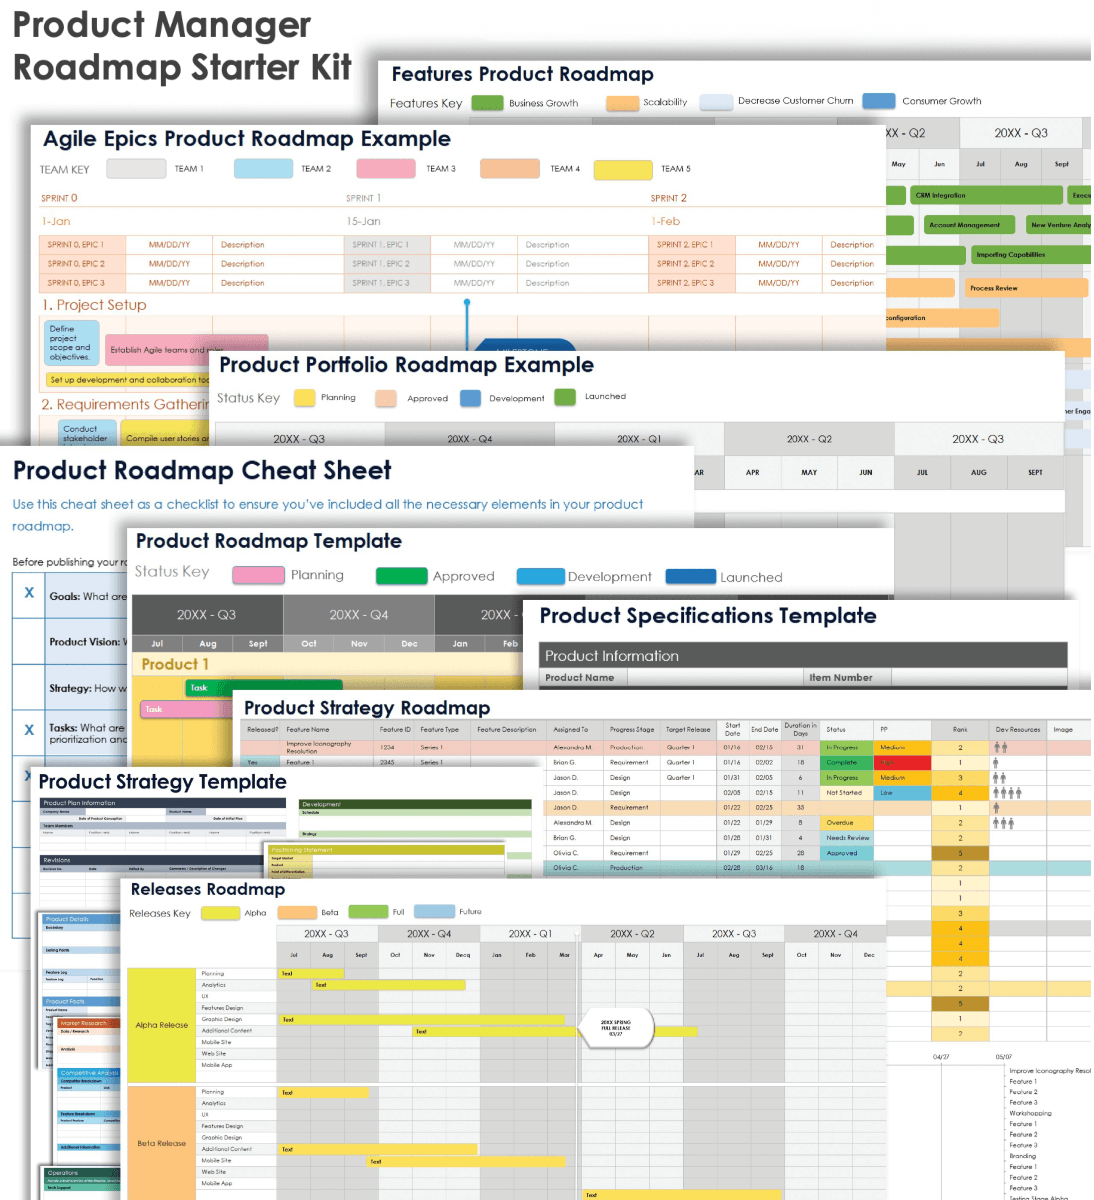
Use the templates in this free starter kit to create different types of product roadmaps. The starter kit includes templates for goals, features, and timeline-oriented roadmaps, so you can choose the version that best fits the needs of your audience.
In this kit, you’ll find:
- A product roadmap cheat sheet for Microsoft Word and Adobe PDF that highlights the key elements to include.
- A classic product roadmap template for Excel for general use.
- A product strategy template for Microsoft Word and Excel , available in sample and blank versions, to illustrate high-level strategic goals.
- A product specifications template for Microsoft Word to map out exact product requirements.
- A features product roadmap template for Excel to list necessary product features.
- A releases roadmap template for Excel to prioritize and schedule upcoming releases.
- An Agile epics product roadmap template for Excel to plan and track epics.
- A product portfolio roadmap template for Excel to show the plan for multiple related products in a single view.
Explore this larger collection of free product roadmap templates for presentations in PowerPoint.
Steps to Create a Product Strategy Template
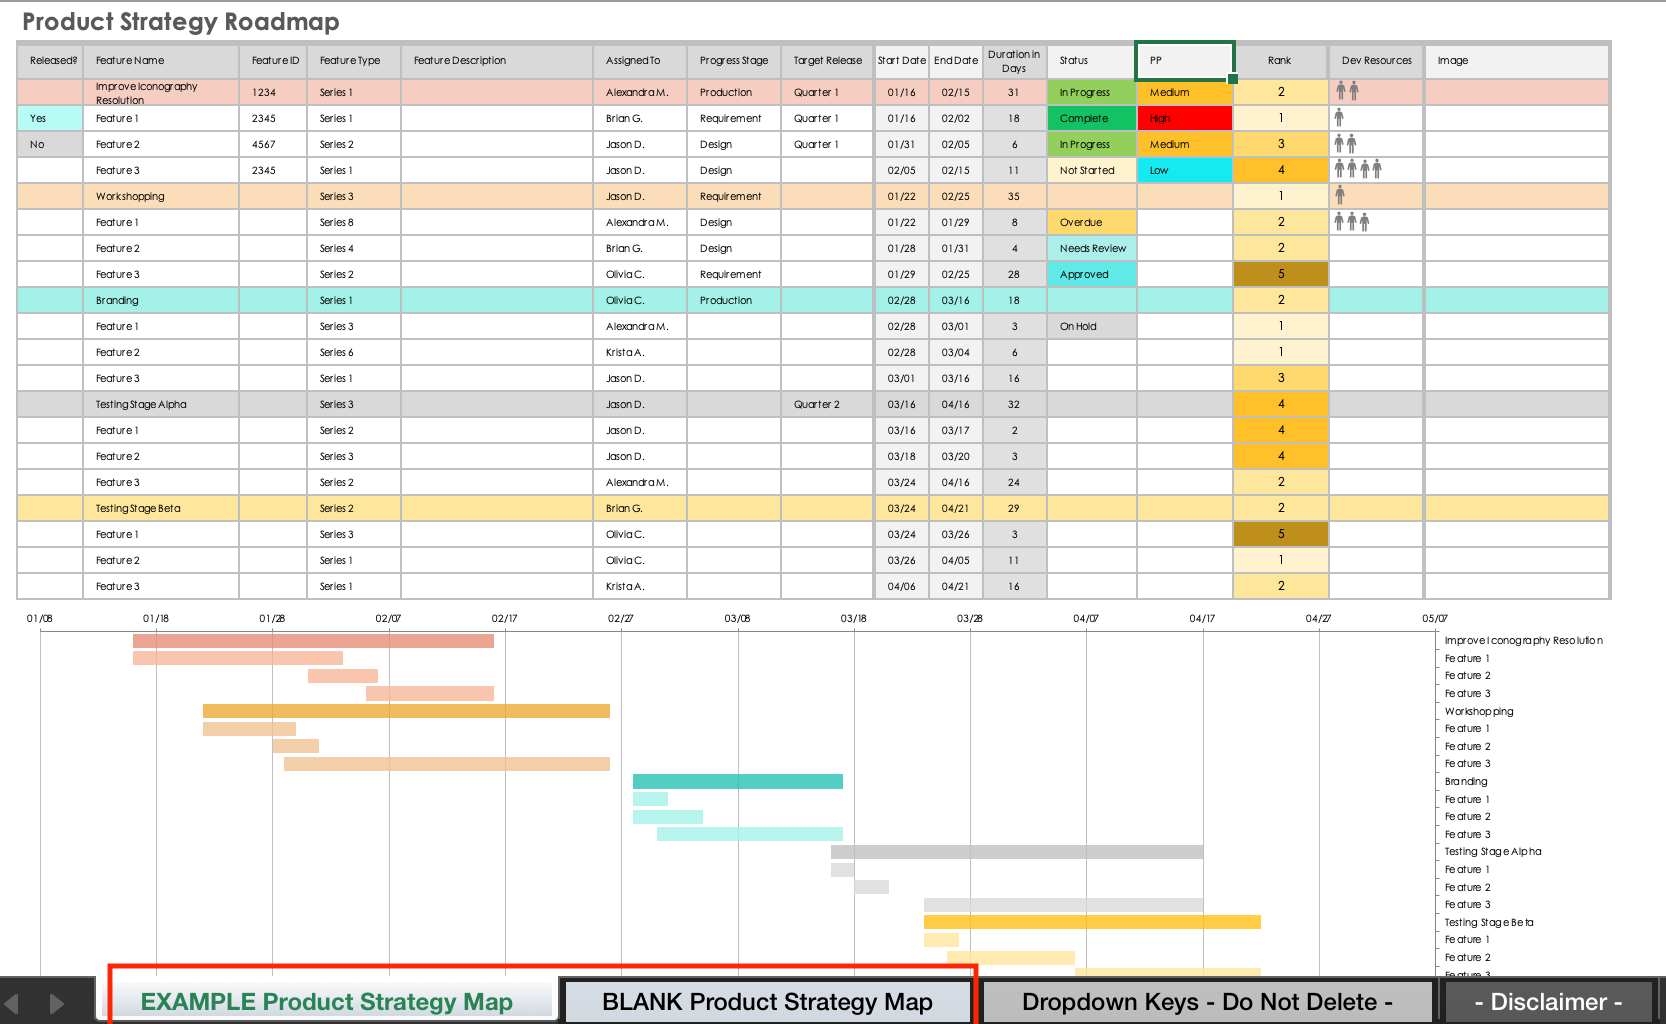
Download the product strategy template to create a roadmap that outlines your product strategy, highlights key objectives, and ties them into larger organizational goals. Use the following step-by-step guide to download, fill out, and customize this product strategy template.
- Download the product strategy roadmap template .
- Open the downloaded template file. It includes two different tabs: The first contains sample data, and the second is blank. You can use the example tab for inspiration and fill out the blank tab with your customized information.
- For each proposed feature, fill out the fields that appear under the following columns: Feature Name, Feature ID, Feature Type, Feature Description, Assigned To, Progress Stage, Target Release, and, if applicable, expected Start Date and End Date. The Duration field calculates automatically based on the date ranges you enter.
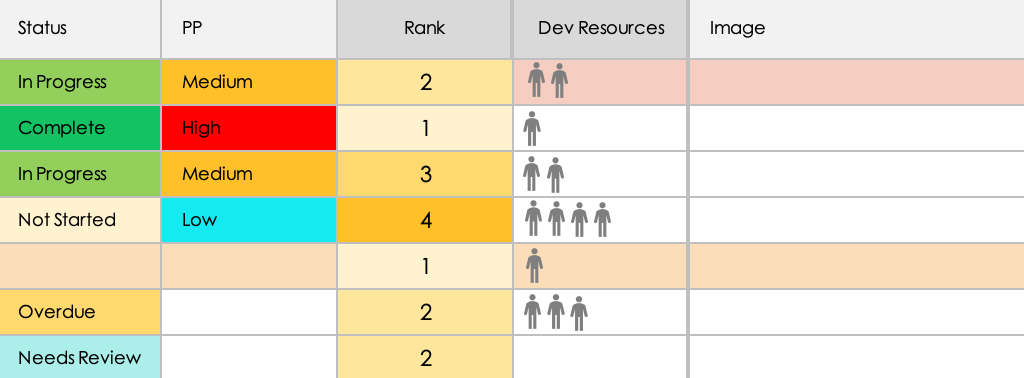
- Fill out the fields on the right side of the template that appear under the following columns: Status, PP (priority), Rank, and Dev Resources. Add an image if helpful.
- Fill out the rest of the rows with information about each feature you plan to develop and release.
- Once you finish filling out the template, the timeline function at the bottom will automatically display the expected timeline. Each individual feature is color-coded, so you can clearly see how long it will take.
- Present this timeline to stakeholders, including management executives, who want to see your strategy and proposed timeline.
Kris Drey offers additional tips for how to create an effective product strategy roadmap. Before beginning, he says, it’s important to “define your strategy. Determine what you are going to build to achieve that strategy: What does senior management want? What do the customers want? What do you need to do to deliver on your strategy?”
From there, Drey continues, “Break those down into epics, features, and stories. Determine when you’re going to build what by slotting those features into releases. Based on all that information, you’ll be able to determine which type (or types) roadmaps you need to maintain in order to address key stakeholders.”
Finally, he shares the following advice about presenting strategy to executives: “Understand your audience. Strategic thinkers are usually upper management, so make sure to speak their language and be mindful of their time and needs.”
Steps to Create a Product Portfolio Roadmap
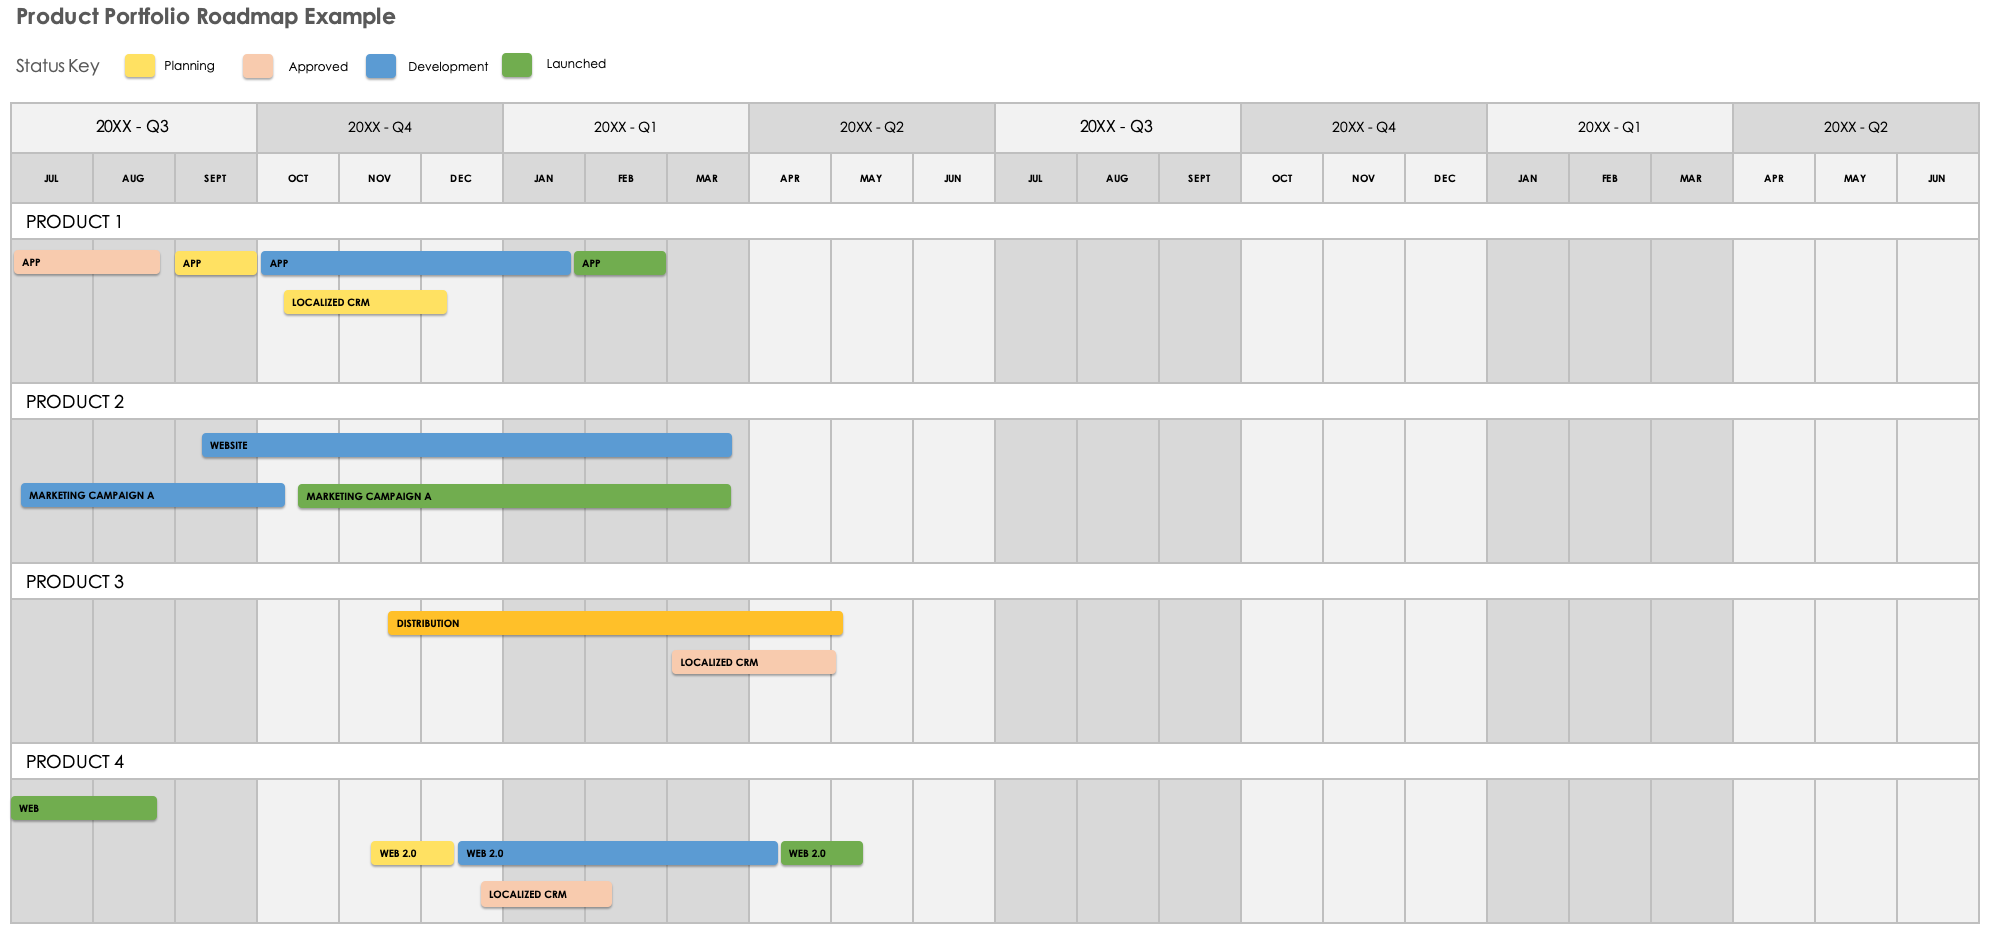
Download the product portfolio roadmap template, available in example and blank versions, to create a visual roadmap that outlines multiple products in one view. The following step-by-step guide shows you how to download, fill out, and customize the template.
- Download the product portfolio roadmap for Excel .
- Open the downloaded template file. It includes two different tabs, one with sample data and one that’s blank for you to fill out from scratch.
- Enter the name of each product in the portfolio, and enter the tasks under each product.
- Drag and drop each task onto the timeline on the right-hand side of the template. To lengthen the amount of time each task takes, click and drag the corner of each task.
- Repeat steps 3 and 4 for each product in your portfolio. Now you have a high-level schedule of how you plan to accomplish multiple product development projects at once.
- Present this high-level product portfolio roadmap to executives, and get them to approve it before creating a more granular schedule of events.
Drey offers the following advice: “Consistency is the name of the game when it comes to portfolio roadmaps because you are working across teams, divisions, etc. Making sure everyone is using the same platform and format is key to maintaining consistency across departments.”
Step by Step to Create a Product Features Roadmap
Use the following steps to download, fill out, and customize a product features template. This is a features-oriented template that lists upcoming features and initiatives and groups them in alignment with the relevant strategic goal. This template comes in two versions: one that’s pre-filled with sample data, and one that’s blank.
- Download the product features roadmap .
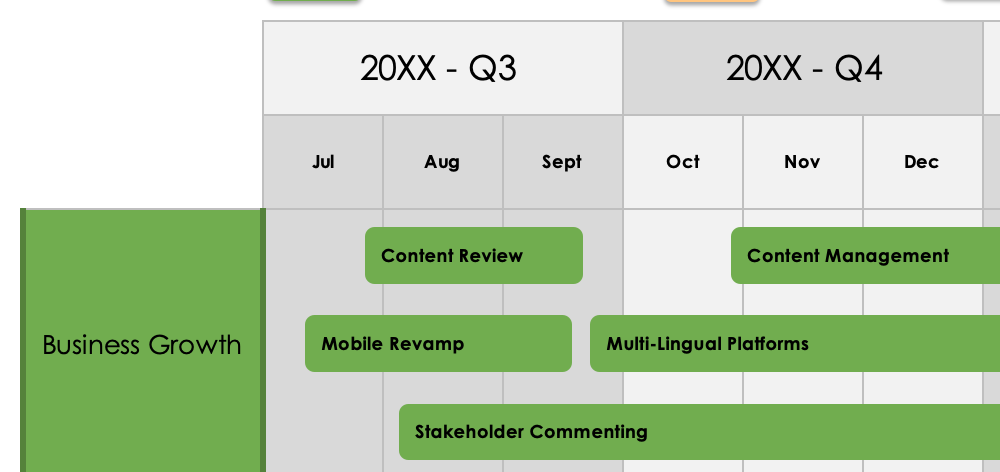
- Open the downloaded file. It displays overall strategic goals (on the left-hand side) and a two-year-long timeline, separated into quarters, which includes all potential features you plan to develop during that time.
- Enter each strategic goal, and then fill out each feature or task associated with that goal.
- Drag and drop each feature to its appropriate spot on the timeline. Remember, this is not a set schedule, but rather an estimation of how long each feature takes to complete.
- To change the duration of each feature, click and drag the corner of the cell to the appropriate length.
- Repeat steps 3 to 5 for each goal and its associated features.
- Present the product portfolio roadmap to stakeholders and upper management for their approval.
Steps to Create a Product Release Roadmap
Follow the steps below to create a product release roadmap from a free template. A release roadmap is intended for internal development teams only, as it provides a granular look at what the devs need to do.
- Download the product releases roadmap template .
- Open the downloaded file. It provides space to detail upcoming releases, including Alpha and Beta testing releases, as well as full releases and any future releases you have planned.
- Enter specifics for the Alpha release. Add features and subtasks to the task bars on the right-hand side of the template — this information provides the basis of your release schedule.
- To change the duration of each feature, drag the corner of the task bar.
- Enter the release date in the white bubble on the right-hand side of the template. Drag and drop it at the appropriate point on the timeline.
- Repeat steps 3 through 5 for the Beta, full, and future release sections of the template.
- Share your finalized release roadmap with the development team. This type of roadmap is typically too granular for executives and not appropriate for external use.
The value of a release roadmap, according to Drey, is that it gives you a full picture of what you need to do — and how long it takes — to create and publish all the features of your product. Because creating a well-defined release roadmap is paramount to the success of your product, he emphasizes how “imperative [it is] to size your features accurately, all the way down to the story, so you can understand your releases tip to tail.”
Steps to Create an Agile Epics Product Roadmap
This step-by-step guide shows you how to create an Agile epics product roadmap from an Excel template. The template includes both a sample data version and a blank version and is customizable to fit the needs of your organization and product.
- Download the Agile epics product roadmap template .
- Open the downloaded file. It includes two tabs: The first displays a version with sample data, and the second is blank, so you can customize it.
- Fill out the Sprint date fields at the top of the template. There is space to include details about each sprint, as well as about each epic within each sprint.
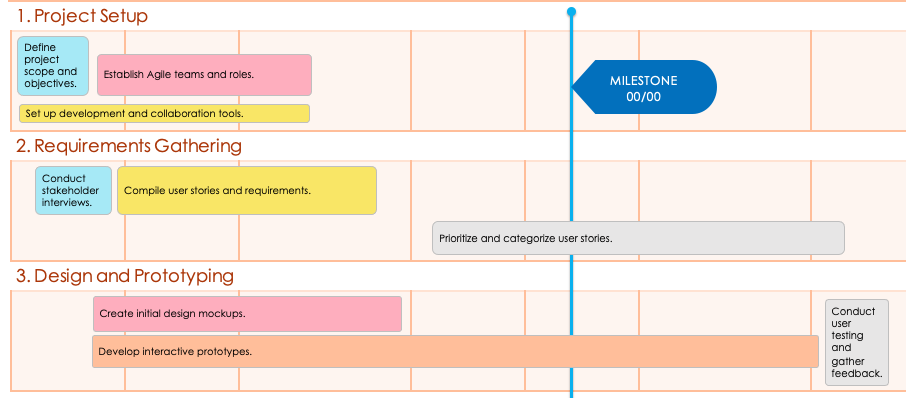
- Fill out the information for the first three sections below, which all pertain to planning: Project Setup, Requirements Gathering, and Design and Prototyping. For each, list the associated tasks.
- Drag and drop each task to the appropriate sprint and epic on the timeline.
- Fill out the remaining five sections pertaining to development and deployment: Software Development Phase I, Testing and Quality Assurance, Software Development Phase II, Deployment and Delivery, and Post-Launch Support and Maintenance.
- Drag and drop each task in these sections to the appropriate sprint and epic on the timeline.
- Share this document with the development team to ensure everyone is on the same page regarding the timeline and prioritization of each epic.
Create a Collaborative Product Roadmap with Smartsheet
Timeline view in Smartsheet empowers users to plan, visualize, and collaborate on date-based work in real-time, enabling you to effortlessly organize tasks, track progress, and communicate status.
In just a few clicks, launch your project’s timeline on any sheet to visualize your work, understand the details, and adjust information, making it easy to track project progress, detect blockers, and communicate statuses.
Discover how timeline view in Smartsheet can help your team visualize date-based work and achieve greater efficiency and transparency across projects.
Learn more about timeline view in Smartsheet.
